Welcome to Alayacare (CAPS)!
The new home of PWS information, Service notes (Formerly, Observation notes), HE23 Consultation Record and CR63 PWS Demographic form.
To go to Alayacare (CAPS) click on this link: CAPS
For any Alayacare (CAPS) issues please email JarrodAllen@clgw.ca
For any IT/Equipment issues, please open an IT Ticket at CLGW IT Ticket
Click the link for the slides from the Module 4: CAPS Training: CAPS Module 4 End User Training
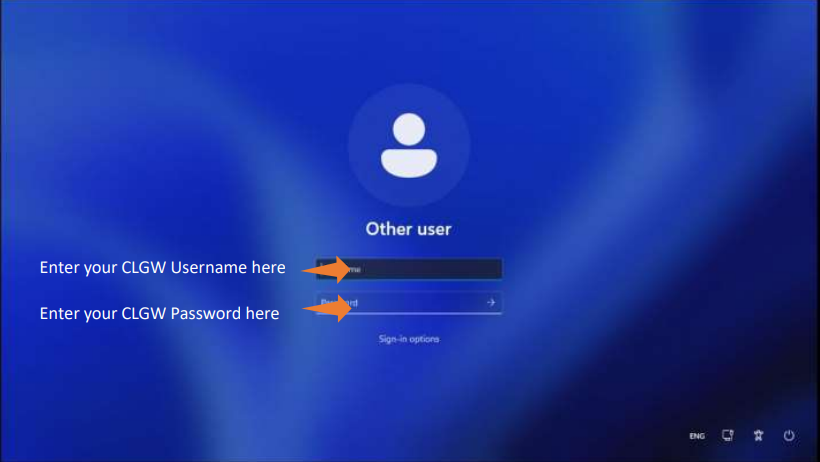
Here’s how you sign in using the CLGW computer:
- Open the CLGW Computer and sign in with your CLGW Account
- Click on “Other User”
3. Enter your CLGW Username (Example: JohnSmith) and your CLGW password
4. Press the Enter button to sign in

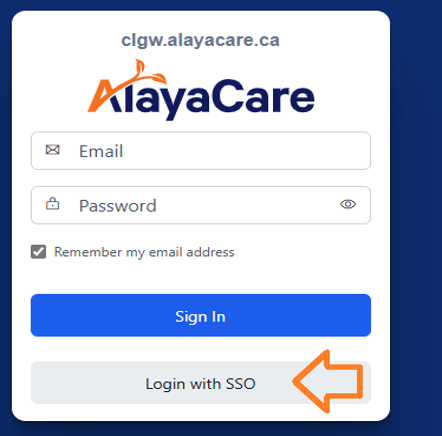
How to access Alayacare from a CLGW device:
The only supported way of accessing Alayacare (CAPS) is to sign into a CLGW computer with your CLGW account and log in using SSO.
1. Open Microsoft Edge while signed into a CLGW Device
2. In the Address bar, enter clgw.ca/caps

3. Click on, Log in with SSO

How to create a Service note:
Here are some best practices:
•Continue to document your Service Notes with the same strategies as you do now.
•Enter your shift time at the top of the Service Note (i.e. 7am-3pm).
•Service Notes are to now be captured digitally, then entered in Alayacare(CAPS) the same day as your shift.
•If you cannot finish and publish your note the same day, on your next shift publish the note with LATE ENTRY at the top.
•Ensure you are finished with the Service Note before hitting Publish, you cannot edit a published Service Note.
Step 1. Open Alayacare with SSO and navigate to correct PWS and click their name.
Step 2. Next, click CLIENTS (PWS), You will see a list of PWS that you are supporting. Choose the PWS you’d like to write a Service Note for by clicking their name.

Step 3. Click on Care Delivery along the top, Then click Progress Notes from the left sidebar as shown. Write your Service Note in the textbox

Step 4. Your draft is automatically saved with a timestamp of the latest save. Make sure to Select Service Note from the dropdown menu. After you are finished the Service Note, click Publish

Step 5. To view your published Service Note ensure that Published and Service Note are selected as shown
System will show:
1.Who wrote the Service Note
2.Time it was published
3.PWS note was for

Here’s how to complete a HE23 Consultation Record:
Step 1. Next, click CLIENTS (PWS), You will see a list of PWS that you are supporting. Choose the PWS you supporting during the medical appointment by clicking their name.

Step 2. Click on Care Management from the top bar. Then click Client Forms from the left sidebar as shown Finally, click the button in the top right corner called +Add Client Form

Step 3. After clicking +Add Form, you will see the popup box shown. Ensure that the correct Service* is selected (usually Group Living). Under Service Form* select HE23 –Consultation Record and click Start Filling. A new window will open and load the form to fill out

•Once the form has loaded, fill in all required fields marked with an asterisk *
•The forms will often have more info or context for each field shown in blue text
•Some forms may require a signature

Here’s how to use the CR26 PWS Demographic form:
To begin, open Alayacare using your SSO (Single Sign on). Next, click CLIENTS (PWS). You will see a list of PWS that you are supporting.

Click on Care Management from the top bar. Then click Client Forms from the left sidebar as shown. Finally, click the button in the top right corner called +Add Client Form. The new form we will use is called ‘CR63 – PWS Demographics Update’

After clicking +Add Form, you will see the popup box shown. The Service* field can be left blank. Under Form* select CR63 – PWS Demographics Update Form and click Start Filling. A new window will open and load the form to fill out

•Update only the fields you need to
•Review to ensure accuracy
•After updating the form, click Save
•Once approved, the information entered in the form will automatically update
.No approval from your supervisor necessary
